

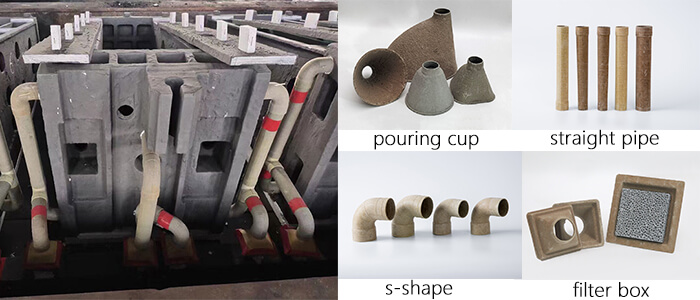
Insulation paper casting runners (also known as recycled‑pulp runners) are an innovative alternative to traditional ceramic runners for iron and steel sand casting. They are lightweight, easy to cut, and – most importantly – carbonize during pouring, leaving no solid waste and no ceramic debris in your sand.
However, to get the best results, you need to install them correctly. This step‑by‑step guide walks you through the entire process – from choosing the right size to closing the mold – so you can avoid common mistakes and maximize the benefits of insulation paper casting runners.
What You Will Need
| Item | Purpose |
|---|---|
| Paper runner sections (straight, elbow, T‑shape) | Form the runner system |
| Utility knife or fine‑tooth saw | Cutting runners to length |
| Sanding block or file (optional) | Smooth cut edges |
| Push‑fit connectors (if required) | Join sections securely |
| Mold (green sand) | Prepared cope and drag |
| Filter box / pouring cup (if used) | Integration with gating system |
Step 1: Plan Your Runner Layout
Before cutting anything, design your runner system on the pattern or mold.
| Consideration | Why |
|---|---|
| Runner diameter | Match to your choke area – typical sizes: 30‑100 mm |
| Runner length | Keep as short as practical to reduce heat loss |
| Connections | Plan where straight sections, elbows, and T‑pieces go |
| Filter placement | Paper runners can connect directly to a filter box |
Tip: Use the same cross‑sectional area as you would for a ceramic csating runner. Paper casting runners are available in standard diameters (e.g., 30, 40, 50, 60, 70, 100 mm).
Step 2: Cut the Runners to Length
Paper runners are easy to cut:
| Tool | Method |
|---|---|
| Utility knife | Score around the tube, then snap. Minimal dust. |
| Fine‑tooth saw | Cut straight through – produces very fine dust (much less than ceramic). |
After cutting:
-
Check that the cut is square (90° to the axis).
-
Lightly sand any rough edges with a sanding block or file. This helps when pushing sections together.
Important: Paper casting runners create almost no dust compared to ceramic casting runners, and what little dust there is is not harmful. Still, avoid breathing any dust.
Step 3: Join Sections Together
Paper casting runners are designed for simple push‑fit connections.
| Connection Type | Method |
|---|---|
| Straight‑to‑straight | Use a short internal connector or external sleeve (if supplied). Push firmly. |
| Elbow (L‑shape) | Push straight sections into elbow ends. Ensure full engagement. |
| T‑piece | Insert straight sections into each leg of the T. |
Check:
-
Joints should be snug – no gaps.
-
If a connection feels loose, wrap a single layer of paper tape or use a small amount of refractory paste (optional).
Do not use: Refractory mortar or ceramic glue – it is unnecessary and may leave debris.
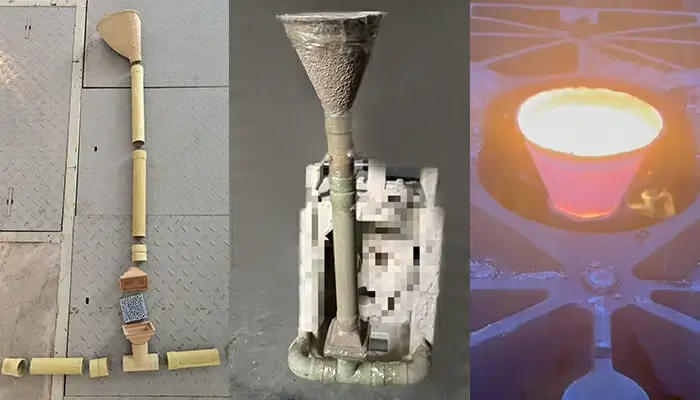
Step 4: Connect to Filter Box or Pouring Cup (Optional)
If your gating system includes a ceramic foam filter or a pouring cup, you can connect the paper casting runner directly.
| Connection | Method |
|---|---|
| Filter box | Push the paper runner into the filter box outlet. Ensure a tight seal – use a paper gasket if needed. |
| Pouring cup | Insert the runner into the cup’s outlet. The cup’s taper will hold it. |
Important: Make sure the runner does not block the filter or the cup’s flow path. The runner inner diameter should match the outlet diameter.
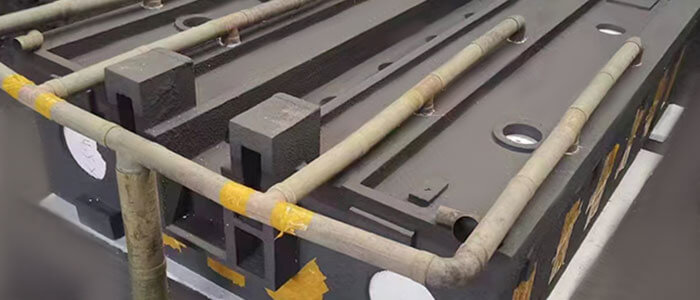
Step 5: Place the Runner in the Mold
Paper casting runners are placed after the mold is rammed, usually on the parting line or in a prepared groove.
| Step | Action |
|---|---|
| 1 | Open the mold (cope and drag separated). |
| 2 | Lay the assembled runner system into the drag half, following your layout. |
| 3 | Ensure the runner sits flat and does not protrude above the parting line. |
| 4 | If needed, cut a shallow groove in the sand to seat the runner (use a small trowel or finger). |
Tip: Paper casting runners are light – they will not sink into the sand. You can secure them with a few dabs of sand‑based adhesive or simply hold them in place while closing the mold.
Step 6: Check Alignment and Close the Mold
Before closing the cope:
| Check | Action |
|---|---|
| Runner alignment | The runner should point directly toward the sprue and gates. |
| Joints | All connections should be tight – no gaps where sand can enter. |
| Height | Runner should not be crushed by the cope. |
Close the mold:
-
Carefully lower the cope onto the drag.
-
Gently press down – you should feel slight resistance from the paper runner but no crushing.
-
If the cope does not close fully, remove the runner and deepen the groove slightly.
Note: Paper runners are compressible but will not rebound. Do not over‑compact or they may deform.
Step 7: Pouring – What Happens
When molten metal enters the runner:
-
The paper casting runner does not burn in the usual sense.
-
Instead, it rapidly carbonizes (thermally decomposes) due to the high temperature and lack of oxygen inside the mold.
-
A thin carbon residue forms on the runner walls. This residue is harmless and does not contaminate the metal.
-
The runner channel remains open, and the carbon layer helps prevent metal penetration.
Result: Clean, erosion‑free runner with no solid waste to remove after the pour.
Step 8: After the Pour – Shakeout
After the casting has solidified and cooled:
-
The paper casting runner will have completely carbonized and collapsed into a fragile carbon skeleton.
-
During shakeout, this carbon residue breaks into fine, harmless dust and mixes with the sand.
-
No ceramic fragments remain to contaminate your sand.
Benefit: Your reclaimed sand stays cleaner, and you avoid the labor of removing and cleaning ceramic casting runners.
Common Mistakes to Avoid
| Mistake | Consequence | Prevention |
|---|---|---|
| Cutting too short | Gaps allow sand to enter runner | Measure twice, cut once. |
| Forcing joints too hard | Runner may buckle or deform | Push gently; use connectors properly. |
| Leaving gaps at connections | Sand ingress causes inclusions | Ensure snug fit; use tape if needed. |
| Placing runner on high spots | Cope crushes runner | Seat runner in a shallow groove. |
| Using mortar or glue | Debris may contaminate sand | Not needed – push‑fit is enough. |
| Expecting the runner to “burn away” | Not accurate – it carbonizes | Understand the process; no action needed. |
Frequently Asked Questions
Q1: Do paper runners produce smoke or fumes?
A: Minimal. The carbonization process releases a small amount of water vapor and organic volatiles, but in a well‑ventilated foundry it is not noticeable. No toxic fumes are generated.
Q2: Can I use paper runners for all alloys?
A: Paper runners are suitable for iron and steel casting. They are not recommended for aluminum because the lower pouring temperature may not fully carbonize the paper, leaving residue that could cause gas defects.
Q3: How do I size a paper runner for my casting?
A: Use the same cross‑sectional area as a ceramic or sand runner. Paper runners are available in standard diameters from 30 mm to 100 mm. For most medium castings, 40‑60 mm is typical.
Q4: Do I need to preheat paper runners?
A: No. Preheating is not required – they carbonize on contact with molten metal. However, store them in a dry place to avoid moisture absorption.
Q5: Can I reuse a paper runner?
A: No. They are single‑use and carbonize during pouring.
Q6: Will carbon residue affect my sand properties?
A: Very little. The fine carbon dust is generally beneficial (it acts as a mild reducing agent) and does not harm sand bonding or reclaimability.
Summary Checklist
| Step | Completed |
|---|---|
| 1. Plan runner layout | ☐ |
| 2. Cut runners to length (clean edges) | ☐ |
| 3. Join sections (snug fit) | ☐ |
| 4. Connect to filter / pouring cup (if used) | ☐ |
| 5. Place runner in drag (groove if needed) | ☐ |
| 6. Check alignment and close mold | ☐ |
| 7. Pour – runner carbonizes | ☐ |
| 8. Shakeout – no ceramic waste | ☐ |
Conclusion
Installing paper casting runners in green sand molds is straightforward and brings multiple benefits:
-
Faster, cleaner installation – no dust, easy cutting, push‑fit joints.
-
No post‑pour cleaning – the runner carbonizes, leaving no ceramic waste.
-
Improved sand quality – no ceramic fragments contaminate your reclaimed sand.
-
Lower overall cost – reduced labor and less waste.
By following these steps, you can successfully replace traditional ceramic runners with paper runners in your iron or steel foundry.
At SF-Foundry, we supply high‑quality paper runners (recycled‑pulp type, comparable to EG RUNNER) in a range of diameters and shapes. Contact us for samples or technical support.
Contact us:
-
Email: info@sf-foundry.com
-
Technical Support: 8618636913699
-
Website: www.sf-foundry.com