

Ever since I cast my first aluminum ingot in my backyard, I’ve been hooked on this powerful skill. The ability to turn old soda cans, lawn furniture, or scrap into solid, usable metal is incredibly rewarding. If you’re a DIY enthusiast, artist, or hobbyist looking to get started, this guide will walk you through the entire process of melting and casting aluminum, with an unwavering focus on safety.
I’ll share the essential steps and lessons I’ve learned from experience, helping you avoid common pitfalls.
The #1 Rule: Safety First!
Molten aluminum is over 1200°F (660°C). The biggest danger isn’t just the heat—it’s moisture. A single drop of water trapped in a mold or a piece of scrap can instantly turn to steam, causing a violent explosion that splatters molten metal everywhere. I cannot overstate this risk.
Before you even think about lighting a torch, you must have this Personal Protective Equipment (PPE):
-
Full Face Shield & Safety Glasses: Wear both. A face shield alone isn’t enough; splashes can come from underneath.
-
Heat-Resistant Gloves: Heavy leather welding gloves are a must.
-
Fire-Resistant Clothing: Wear a long-sleeved, natural-fiber shirt (like cotton), heavy-duty pants, and sturdy leather boots. No synthetic fabrics like polyester—they can melt onto your skin.
-
Leather Apron: An extra layer of protection is always a good idea.
Your Workspace Setup is Critical:
-
Work outdoors or in a very well-ventilated garage with the door open.
-
Have a Class D fire extinguisher or a large bucket of dry sand nearby for metal fires. Water is not an option.
-
Keep your area clean, dry, and organized to prevent trips and falls.
Essential Equipment for a DIY Aluminum Foundry
You don’t need a professional setup to start. Here’s the core equipment you’ll need, much of which you can build or source affordably.
| Equipment | Purpose & Tips |
|---|---|
| Furnace | Contains the heat. A simple DIY version can be made from a steel bucket lined with refractory cement. |
| Heat Source | A standard propane torch works for small melts. For larger projects, a propane burner (like a “weed burner”) is more efficient. |
| Crucible | The container that holds the molten aluminum. Must be graphite or steel-silicon carbide. Never use a random steel can! |
| Crucible Tongs | Specially designed to securely lift and pour the hot crucible. Don’t try to improvise with other tools. |
| Molds | Define the final shape. Start with simple cast iron ingot molds to practice. For complex shapes, green sand or lost foam casting are great options. |
My Step-by-Step Process for Melting and Casting Aluminum
Step 1: Source and Prepare Your Aluminum
I typically start with clean scrap like extrusion off-cuts or old piston heads (which are a high-quality aluminum). You can use cans, but they contain a lot of impurities. My pro-tip: Pre-melt your scrap into ingots first. This burns off any coatings and creates clean, uniform stock for your future projects.
Step 2: The Melt Down
-
Pre-heat Everything: Place your empty crucible into the furnace and let it heat up for a few minutes. This drives off any hidden moisture—a crucial safety step.
-
Load and Melt: Fill the hot crucible with your aluminum scrap. Close the furnace lid and let it roar. You’ll see the metal go from solid, to shiny, to a swirling liquid pool. The silvery film on top is aluminum oxide, or “dross.”
Step 3: Skim and Pour
-
Once fully liquid, put on all your PPE. Carefully lift the crucible out with your tongs.
-
Gently skim the dross off the surface using a pre-heated steel rod or spoon. Remember, a cold tool can cause a steam pop.
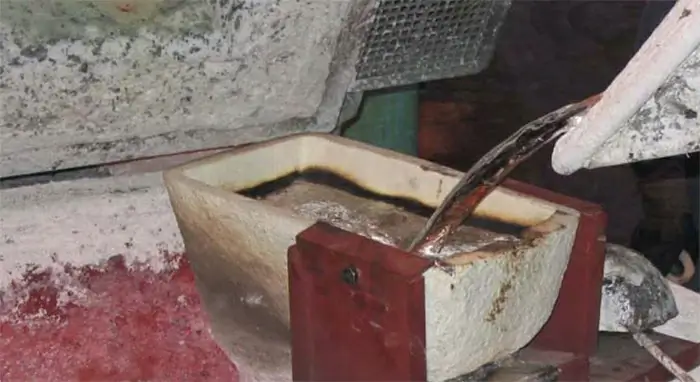
-
With a steady, confident motion, pour the molten aluminum into your pre-heated mold. Pour continuously until the sprue (the funnel) is full. This ensures the mold cavity is completely filled and accounts for shrinkage as it cools.
Step 4: Cooling and Finishing
Let the casting cool completely on its own—never use water to quench it. Once cool, you can break it out of a sand mold or remove it from a metal mold. You’ll be left with rough pieces of metal called “gates” and “flash.” I use an angle grinder and files to clean these up, a process known as “fettling,” to reveal the final piece.
Key Takeaways for Your First Cast
-
Respect the Moisture: It’s the enemy. Pre-heat your tools and molds.
-
Start Simple: Don’t try to cast a complex sculpture on day one. Practice by making ingots to master the flow and feel of pouring.
-
Be Prepared: Have your molds, tools, and safety gear laid out before you have molten metal. The process demands your full attention.
Melting and casting aluminum opens up a world of making and repairing. By following these steps and prioritizing safety, you’ll be well on your way to turning everyday scrap into lasting, solid creations. Happy casting